Vary change to clip speed
Move an unsplit speed keyframe
Move a split speed keyframe
Play a clip backward, then forward
Remove the Time Remapping effect
You can speed up, slow down, play backward, or freeze video portions of a clip using the Time Remapping effect. Using speed keyframes, you can change speed numerous times within the same clip. Take a clip of a man walking, for example. You can show him moving forward quickly, slowing suddenly, stopping mid-step, and even walking backward, before resuming his forward motion. Unlike Clip Speed/Duration which applies a constant speed across the entire clip, Time Remapping allows you to vary the speed throughout the clip. Also, you can ease in or ease out speed changes.
You can apply time remapping only to instances of clips in a Timeline panel, not to master clips.
When you vary the speed of a clip with linked audio and video, the audio remains linked to the video, but remains at 100% speed. The audio does not remain synchronized with the video.
You create variable speed changes by applying speed keyframes. You can apply speed keyframes in the Effect Controls panel, or in a clip in a Timeline panel. Applying speed keyframes in either location is like keyframing Motion, Opacity, or any other keyframe effect, with one notable difference: a speed keyframe can be split to create a transition between two different playback speeds. When first applied to a track item, any change in playback speed on either side of a speed keyframe is instantaneous at that frame. When the speed keyframe is dragged apart and spread out beyond one frame, the halves form a speed change transition. Here, you can apply linear or smooth curves to ease in or ease out the change between playback speeds. See the video tutorial, Variable Speed Changes, at www.adobe.com/go/vid0235, or the video tutorial, Time Remapping In Premiere Pro CS3, on the Creative COW website.

Footage is displayed at constant speed in one direction.

Time-remapping distorts time for range of frames within clip.
Note: It is best to apply time remapping controls to a clip in its own video track, or at least one not followed immediately by other clips. Slowing any portion of a clip makes the duration of that clip longer. If a second clip immediately follows the lengthened clip in the video track, the lengthened clip is automatically trimmed where the second clip begins. To recover the frames trimmed from the lengthened clip, click the Track Select tool, Then Shift-drag the second clip toward the right to make room. All clips lying to the right move to the right. Click the Selection Tool, then drag the right edge of the lengthened clip to the right, exposing its trimmed frames.
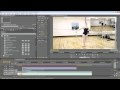
Vary change to clip speed- In a Timeline panel, click the Clip Effect menu and choose Time Remapping > Speed. (The Clip Effect menu appears next to the filename of every clip in a video track. Zoom in, if necessary, to make enough room in the clip to display the menu.)
A horizontal rubber band that controls the speed of the clip appears across the center of the clip. The clip is shaded in contrasting colors above and below the 100% speed demarcation. A white speed-control track appears in the upper portion of the clip, just below the clip title bar.

Choosing Time Remapping > Speed from a video effect control
2. Ctrl-click (Windows) or Command-click (Mac OS) at least one point on the rubber band to set a keyframe. Speed keyframes appear near the top of the clip, above the rubber band in the white speed-control track. Speed keyframes can be split in half, acting as two keyframes for marking the beginning and end of a speed-change transition. Adjustment handles also appear on the rubber band, in the middle of the speed-change transition.

Moving a speed keyframe up or down. Note its separable halves.
A. Speed keyframeB. Rubber band
3. Do one of the following:Drag the rubber band on either side of the speed keyframe up or down to increase or decrease the playback speed of that portion. (Optional) Press Shift while dragging to limit the speed change values to 5% increments.
Shift-drag the speed keyframe to the left or right to change the speed of the portion to the left of the speed keyframe.
Both the speed and duration of the segment change. Speeding up a segment of a clip makes the segment shorter, and slowing down a segment makes it longer.
(Optional) To create a speed transition, drag the right half of the speed keyframe to the right, or the left half to the left.
A gray area appears between the halves of the speed keyframe, indicating the length of the speed transition. The rubber band forms a ramp between the two halves, indicating a gradual change in speed occurring between them. A blue curve control appears in the gray area.
 Blue curve control in gray area between halves of a speed keyframe
4. (Optional) To change the acceleration or deceleration of the speed change, drag either of the handles on the curve control.
The change of speed eases in or eases out according to the curvature of the speed ramp.
 Dragging a curve control handle to ease in a speed change
5. (Optional) To revert a transition speed change, select the unwanted half of the speed keyframe, and press Delete.
Note: Speed and Velocity values for the Time Remapping effect are shown in the Effect Controls panel for reference only. You cannot edit these values directly there.
Move an unsplit speed keyframe
In a Timeline, Alt-click (Windows) or Option-click (Mac OS) the unsplit speed keyframe, and drag it into its new position.
Move a split speed keyframe
In the white control track area of the clip, drag the grey-shaded area of the speed transition into its new position.
Play a clip backward, then forward
In a Timeline panel, click the Clip Effect menu and choose Time Remapping > Speed. (The Clip Effect menu appears next to the filename of every clip in a video track. Zoom in, if necessary, to make enough room in the clip to display the menu.)
A horizontal rubber band that controls the speed of the clip appears across the center of the clip. The clip is shaded in contrasting colors above and below the 100% speed demarcation. A white speed control track appears in the upper portion of the clip, just below the clip title bar.
Ctrl-click (Windows) or Command-click (Mac OS) on the rubber band to create a speed keyframe .
Ctrl-drag (Windows) or Command-drag (Mac OS) a speed keyframe (both halves) to the place where you want the backward motion to end. A tool tip shows the speed as a negative percentage of the original speed. The Program monitor displays two panes: the static frame where you initiated the drag, and a dynamically updating frame that reverse playback returns to before switching to forward speed. When you release the mouse button to end the drag, an additional segment is added for the forward playback portion. The new segment has the same duration as the segment you created. An additional speed keyframe is placed at the end of this second segment. Left-pointing angle brackets appear in the speed-control track, indicating the section of the clip playing in reverse.
The segment plays backward at full speed from the first keyframe to the second. Then, it plays forward at full speed from the second to the third keyframe. Finally, it returns to the frame at which the backward motion began. This effect is called a palindrome reverse.
You can create a segment that plays in reverse and doesn't return to forward playback. Use the Razor tool or the Trim tool to remove the segment of the clip with the forward playback section.
 Keyframes, left-pointing angle brackets, and rubber band in a palindrome reverse
6. (Optional) You can create a speed transition for any part of the change in direction. Drag the right half of a speed keyframe to the right, or the left half to the left.
A gray area appears between the halves of the speed keyframe, indicating the length of the speed transition. The rubber band forms a ramp between the two halves, indicating a gradual change in speed occurring between them. A blue curve control appears in the gray area.
Blue curve control in gray area between the halves of a speed keyframe
(Optional) To change the acceleration or deceleration of any part of the directional change, drag either of the handles on the curve control.
The change of speed eases in or eases out according to the curvature of the speed ramp.
Dragging a curve control handle to ease in a speed change
Remove the Time Remapping effect
You cannot toggle the Time Remapping effect on and off like other effects. Enabling and disabling Time Remapping affects the duration of the clip instance in a Timeline. In effect, Time Remapping performs an edit. However, you can use the Toggle Animation control in the Effect Controls panel.
Click the Effect Controls tab to make this panel active.
Click the triangle next to Time Remapping to open it.
Click the Toggle Animation button next to the word Speed, to set it to the off position.
This action deletes any existing speed keyframes, and disables Time Remapping for the selected clip.
Note: To re-enable Time Remapping, click the Toggle Animation button back to the on position. You cannot use Time Remapping with this button in the off position.

 It’s no secret that two of the biggest enhancements in CS5 are the Mercury Engine and the new metadata workflow. What is surprising is how much faster CS5 previews and renders, especially when editing H.264 based formats (like AVCHD or footage from the Canon EOS 7D) or encoding to H.264 formats. This webinar will quantify these performance enhancements using real world projects and detail the optimal CPU, OS, RAM and graphics card configuration. If you produce script-based productions, and value metadata in the production and output pipeline, you’ll really appreciate the script to screen workflow that Adobe created in CS5, including the new Adobe Story, a script development tool, the enhanced Adobe OnLocation, for shot list creation and metadata collection during the shoot, to Premiere Pro for editing and out to Flash. There’s even a new time-based workflow for automatically matching OnLocation placeholder shots with clips shot with a non-tethered camera. In addition, there are several critical new features in Premiere Pro, SoundBooth and Adobe Media Encoder, like the Ultra Chromakey effect from Serious Magic, now a GPU accelerated effect in Premiere Pro. You’ll read a bunch of hype about the new release, this webinar will lay the new features out for you and tell you the investment in hardware and software that you’ll need to fully leverage them. If you’re considering upgrading from CS3 or CS4, you’ll find this 90 minutes very informative and worthwhile.